Saturday, 31 August 2013

Mimco Pouches Small and Medium Sized Review & Pictures


Mimco is an Australian higher end brand that makes all kinds of accessories, mostly bags and wallets.
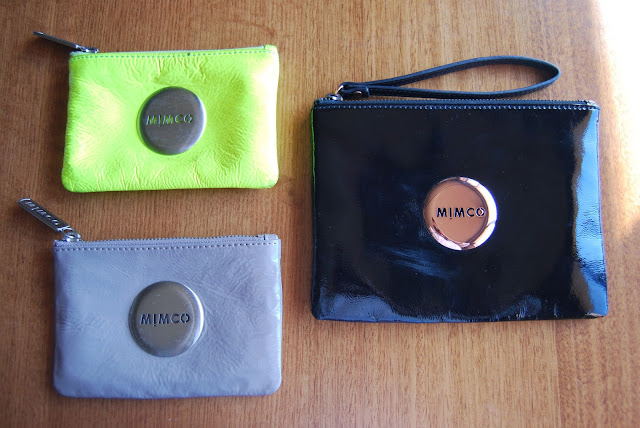
My favourite items from their collections are these 'pouches' that come in 2 different sizes and a bunch of different colours. Each season Mimco bring out different colours and patterns but they also have their 'Mimco Loves' line which you can buy all year round. I own three of these pouches currently and thought i'd do a little review on them as they are kind of expensive and I thought it might help people who are interested in purchasing them but don't know if they want to spend the money on them.

Medium Leather Pouch

The medium sized pouch is my latest addition to my little Mimco family. The reason that I wanted to get the bigger size was to use when I'm going out and I want to drive my keys don't really fit in the smaller sized pouch. Its made of black leather and has a rose gold button on the front which I love.
The medium pouch is a great little clutch bag, perfect for those more fancy nights out where you want to pack a few extra things on your way out. The larger size pouches have a little zip compartment inside which is perfect for putting cash and your cards in. They also have a little arm strap making it easier to carry around. 
The medium pouches can seriously fit a whole bunch of stuff, much more then I've shown here and are a great little investment piece if your looking for something that will last you a long time and will never go out of style. 
The medium pouch retails for $99.95

Small Leather Pouch


The small leather pouches are great little accessories for on the go. I currently own two of them in very different colours, one a more summery colour and another in a more neutral wintery colour.
This taupe coloured one is perfect for nights out where you only want to bring a few things like your phone, a lipstick, money and your cards. The smaller size fit perfectly in your hand are super easy to carry around, much easier then having to bring a small bag or a clutch that you have to worry about on your arm. I feel a lot safer carrying these little pouches around because I know where they are at all times.
The smaller size definitely don't fit as much as the larger ones but are still a perfect size for carrying all your necessities around. 

The taupe pouch retails for $69.95 but I purchased mine on sale for $45


This neon yellow pouch is the first one I ever bought. I originally bought it in the Christmas sales because it was so much cheaper then the others, probably because it was such a bright colour. I absolutely adore this pouch. It came with me on my New Years vacation and has seen it all, its been to the beach, its been filled with sand, its been dropped on the road, its been stepped on, its dealt with extreme heat and is still going strong. As you can see the leather on this one has definitely softened in comparison to the others and has gone kind of wrinkly, but I don't mind it at all. This pouch has now been retired from crazy nights out and I now use it to hold all my everyday necessities. It doesn't leave my handbag! I keep tissues, hand wipes, hand cream, bandaids, pain killers, throat lozenges, a mirror and a little perfume (I also keep feminine products in here but didn't feel it necessary to show you!) and it all fits with room to spare. 
This just goes to show how much you can actually fit into these pouches if you really try, the only reason I don't try and squeeze this much into them when I'm going out is because i'm scared that things might fall out when I'm trying to pull other things out.

This pouch also retails for $69.95 but like I said I got this one in the Christmas sales for only $34.95

Overall I think these pouches are a great thing to have in your bag/wallet collection. I know a lot of people who use the small pouches as their everyday wallets instead of carrying a big bulky wallet around. They are incredibly durable and are really well made, from the lining to the zip and even the button on the front is very high quality. 

I will definitely be buying more of these in the future when they release more colours and fabrics!

Elizabeth xx


Monday, 26 August 2013

Fing'rs Ultimate French Nails Review & Pictures

If you can't already tell I love french manicured nails, they just look so neat and elegant and flawless on everyone if they're done properly. I was wondering the aisles of Priceline (which is the equivalent to an American drugstore) and saw these stick on nails. Usually I'm quite turned off the whole at home acrylic nails just because they can look so tacky but these ones are very much the opposite of the ones i'm used to seeing. The great things about these it that they are quite short, probably about the same length that my nails would be normally if I was going to paint them with a french manicure myself. They are also a peachy colour, most french fake nails are a light pink (which this company does as well) which i'm not really a fan of. This peach looks so natural on the nails and doesn't look fake and cheap at all.
In the little kit you get 24 nails which you should be able to find a match for each of your nails out of. You also get two forms of adhesive, the stickers which I hate and are really hard to use, and the glue which is my choice of adhesive for using these nails.

These guys are really super easy to apply, you just find your match and then place a little bit of the glue onto a clean buffed nail, you then press the nail on and hold it for 10 - 15 seconds and voila you hace a perfectly manicured french nail!
Before applying

After applying

They are also super easy to remove, the instructions says that you need to soak them in acetone to break down the glue, however, I did not do that at all. I just used my nails and pulled them off from the base of my nails. While this is exactly what they tell you not to do it was the easiest way for me to remove them. Another awesome thing about removing them this way is that I got to re use them 4 separate times! The glue tends to leave a bumpy residue on the nail however thats nothing a little bit of nail polish remover and a bit of buffing can't fix.
The lasting power on these guys isn't the greatest but for someone like me who needs to take them off when I work they're great, they come off super easy and then can be re applied whenever you can wear them again.

Over all I'd highly recommend them if your in need of a quick nail fix and don't want to fuss around with painting your nails! I'm also quite keen to try the other nails in the Fing'rs range!

Elizabeth xx

Saturday, 24 August 2013

August Beauty Haul

After doing my daily Priceline website check I saw that Maybelline was 50% off...and when you see 50% off anything you buy it, anything above 40% off anything is a great deal so I couldn't pass this up. Also by some law of online shopping I bought a whole bunch of other stuff as well.

For the Skin

Left to Right: Formula 10.0.06 So Totally Clean, Garnier Youthful Radiance Night

I needed a new cleanser and toner and I love the Formula 10.0.06 brand so I picked this one up , its really refreshing and works well. I also re purchased my Garnier night cream because I ran out of my other one.

For The Nails

Left to right: Maybelline Color Show Nail Polishes in 310 Iced Queen, 150 Born With It, 230 Fierce N Tangy

For The Face

I bought these nail polishes purely because I wanted to try Maybelline nail polishes and they were only around 2$ each a total bargain.  I haven't tried any of them yet but I'll do a full of review them soon!
Left to Right: Maybelline Fit Me Blush in Medium Pink, Maybelline Instant Age Rewind Erase Dark Circles, Essence Silky Touch Blush in Baby Doll, Maybelline Lip Liner in Red

I've decided that I need to bite the bullet and start using blushes, I've been scared of them for so long but these were both under $5 so I figure even if I don't like them it's no great loss. One thing I will say about these is that the Maybelline one sucks, literally sucks. It has no pigmentation and leaves a weird glitter on the skin. The essence one however which was only $2 is amazing, it has great colour pay off and looks great on the skin. The other two items are just boring re purchases, another under eye concealer and a red lip pencil.

For the Eyes

Top to Bottom: Models Prefer Brow Fixer, Maybelline Colour Tattoo in Tough as Tope, Models Prefer Shadow Pencil in Down to Earth, Maybelline Eye Studio in Copper Chic

I was in need of a clear brow gel and figured I'd grab the cheapest one I could find, I also got another color tattoo in the taupe colour, I love the bronze one and figured I could add another to my collection. The eye shadow pencil is also great its similar to the Nyx jumbo pencil except with a bit more sparkle. I also grabbed an eye shadow quad for reasons which I still don't know, and I regret it. While the colours are great and have great colour pay off they just have way too much shimmer in them for me.

That's my beauty haul for August, I might try and do these monthly if I buy stuff each month!
Elizabeth xx

Thursday, 22 August 2013

YSL Rouge Volupte Number 12 Forbidden Burgundy - Review & Swatches

 I have an unhealthy obsession with the YSL lipsticks, the formula, the smell and the packaging are just amazing and the colour selection is pretty amazing too. The price on the other hand is not so amazing and every time I go to buy one I cringe as I swipe my card to pay, however that feeling is instantly gone once I have my little gold tube in my hands.
 I saw this colour on Chloe Morello's instagram photo and was instantly attracted to it. Its called Forbidden Burgundy and is the prettiest deep plum colour. The reason I was so drawn to this one was that is has a slight pink tinge to it which looks really nice on the lips and stops it from looking too vampy which can happen with a lot darker lip colours. This lipstick would look amazing on all skin tones, if your super pale like me or even if you have much darker skin it would look stunning.
 These lipsticks are super creamy, almost like a very opaque balm which lasts for a decent 5-6 hours before any need of touchups. This one is also really easy to apply, unlike a lot of the dark lipsticks that I own this one I can apply without a mirror if need be even though using one is always better.
They do however have the tendency to bleed slightly around the edges just because they are so creamy so make sure that your super careful when applying them, but dont let that scare you if you take a little bit of extra time putting it on it will all be okay!

These lipsticks are defiantly worth the money even though I wouldn't mind if they were slightly cheaper

Tuesday, 20 August 2013

OPI Nail Envy Review

After hearing great things in the beauty world about OPI's Nail Envy I took the time to look into it here in Aus, and without failure it was at least $20 more here then it is overseas insert rant about overpriced products here... However during my weekly My Beauty Spot visit to see one of my best friends who works there I spotted a bottle of the stuff amongst all the other OPI polishes! My mouth literally dropped and I'm pretty sure I did a little happy dance because I knew that it would at least be cheaper then here then everywhere else and I was right. Instead of being $30 or $40 which is how much it costs everywhere else it was cue gasps of sheer excitement ONLY $9 I HAVE NEVER BEEN SO EXCITED. Without hesitation I bought it, there was no way I was passing this baby up.

Now to the product, it claims to stop nails peeling and to helps strengthen the nail. You apply two coats to begin with and then a coat every day after the initial 2. It's quick drying and goes on clear so you don't have to worry about a perfect application, I tend to just slap it on before I go to sleep and that works fine.

I've been using this for two weeks now and let me say that my nails have never been this strong, they still peel slightly but I'm blaming that on the fact that my day job is pretty hard on my hands and nail a lot of lifting and a lot of cleaning so it hasn't been amazing at fixing that however it seriously has worked wonders in the strength department.

I would definitely recommend this to people who have weak nails as it has really helped my poor fragile nails out a lot!
Elizabeth xx

Friday, 16 August 2013

bellabox Australia August Box - Review & First Impressions

 I've been looking to subscribe to a new monthly subscription box for a while now after I unsubscribed from another box earlier in the year (LustHaveIt if you were wondering which one it was). After seeing   bellabox on instragram and seeing the quality and the amount of products that people were receiving each month I decided to get on board. And let me tell you I am not disappointed!

You get 7 deluxe samples sent to your letter box each month which can range from makeup to hair care. Here is what I got in this months box, i'm excited about everything that I received especially the Talavou Naturals glow powder!

Let me know if your subscribed to any of these beauty boxes here in Australia and how your liking them!

Elizabeth xx

Tuesday, 13 August 2013

Apologies

I'm sorry I've been absent for the last week or so, I've been experiencing technical difficulties and would rather post no content then content I'm unhappy with. Hopefully I'll return with more posts soon! Sorry again!
Elizabeth xx

Monday, 5 August 2013

Revlon Nearly Naked Foundation and Powder Review & First Impressions

I was super excited when I saw the stand for this foundation in my local Priceline store as I've been waiting for this foundation for what seems like months. Anyways I bought both the powder and the foundation because at the time I had a momentary lapse in sanity and felt that I needed both which I really didn't. 

 I bought the foundation in Ivory and the Powder in 010 Fair, both of which are the lightest shades in the range. Even though they are both the lightest of the bunch I honestly feel like they are slightly darker then they should be. If you are any paler then me these honestly wouldn't work for you as I feel like they would show up slightly orange or slightly too dark on your skin. Another thing I would like to add is that the powder is way darker then the foundation, and when I first put the two on together my friend questioned what was on my face, not because she liked my skin, but because I was pretty much wearing a cake mask not good.

The foundation on its own however is beautiful. It has a kind of dewy finish, it is by no means matte but leaves your skin with a subtle glow and dewiness that looks really healthy. I also would say that it has a light coverage but it is definitely build able which is what I've been doing to get the extra coverage I need on my cheeks. It is also super easy to blend on the skin and doesn't set in place for a while so you have time to blend it all in before it sets in place. I was a bit worried that throughout the day it would slip and slide off my face and become shiny but it really doesn't, in fact I prefer it once its been on the skin for a long period of time. I wore this foundation for over 10 hours yesterday and it had the same amount of coverage over time as it did when I first applied it which was very impressive.

The powder on the other hand is not my favourite powder that I have tried purely because it is way too dark for my skin, also its a little heavier then I like for my powders. I haven't tried this on my skin for a full day because its too dark and I look a tad silly, but I'm sure that if this matches your skin and if you like a heavier coverage powder then this would be fantastic for you.

Have you tried these and do you like them? Let me know!
Elizabeth xx

Saturday, 3 August 2013

Sally Hansen Salon Effects French Mani - Review and Pictures!


I saw these guys in Kmart the other day and picked them up on a whim, I've used them before and failed miserably, I will say that it wasn't my fault however because no where in the instructions does it say that you'll need a top coat which you will.  Anyway, the concept is pretty simple, these are stickers that you apply to your nails, no drying time and an even application every time.
In the box you get a massive pamphlet of instructions which also has an emery board and a tool to push your cuticles back, then you get three little packets of stickers, one with the white tips and two with the clear top layer.


These are the worlds most fiddly things, you first need to file back your nails and push the cuticles back also ensuring that there is no other residue on your nails. Then you take the little white strips and apply them to the tips of each nail filing off the excess sticker part each time. After doing all of the tips you then apply the clear strips on top filing off the excess same as the white bits. Sounds simple doesn't it? Well it is, but it took me half an hour to do! Thats 25 minutes too long in my opinion. I don't want to be spending that much time on my nails especially when I can paint them in 2 and be done with it. I guess if your not the most confident of nail painters then this would be perfect for you as it is pretty much fool proof, but for me, someone who has the whole at home mani down pat its not worth it.

Another thing, APPLY A TOP COAT, no where on the pamphlet does it say that you need to apply a top coat however if you don't these little suckers will peel right off leaving your nails as bare as they were to begin with.


I must admit that the finish of them is fantastic and I am quite impressed with how they look but like I said if they took a quater of the time I'd be even more impressed with them.
Also the claim to "last 10 days" is completely false, I applied these yesterday morning and have had to apply a top coat to them three times to stop the edges from peeling up, not impressed.

Have you tries these nail strips and do you like them? Because I know that others exist such as the Nail Rock ones and would love to know how they work!
Elizabeth